Join My Team with Stampin' Up!
Sunday, October 18, 2009
A Gift for You

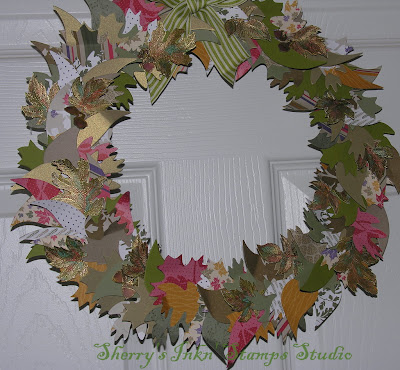
Autumn Wreath
 Is this a beauty or what? I CASed the idea from the Stampin' Up! Idea Book and Catalog, p. 92. I used a variety of papers and cardstock. Here is the supply list:
Autumn Traditions #115668, p. 160 (I used one sheet of each design)
Brushed Gold CS #102935, p. 159 (2 sheets)
Old Olive CS #106544, p. 156 (2 sheets)
Mellow Moss CS #106548, p. 157 (2 sheets)
Craft CS #107070, p. 159 (2 sheets)
Gold Embossed leaves from the Autumn Splendor Stamp Set #116503, p. 12 Holiday Mini Catalog painted with an Aqua Painter and ink from Bermuda Bay, Old Olive, Crushed Curry and Dusty Durango, IBC p. 155-157 (Thank you Sandi MacIver for the leaves)
12" wire wreath from craft store, cover with old green ribbon to have something to hot glue the leaves to.
I used the SU Leaves #2 die to cut the leaves.

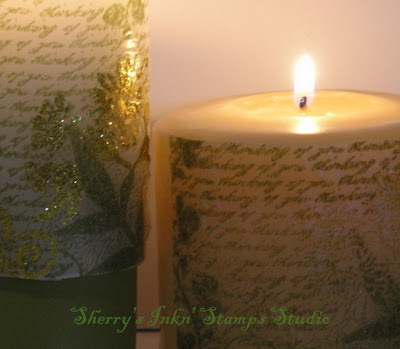
Altered Candles


I had a fun day on Saturday, just playing with Ideas I had seen on YouTube. I'm not sure exactly who inspired me, but there are several who have videos. I recycled some old candles, I thought this was a good way to give them a facelift. I used the Fresh Cuts Stamps Set (IBC #111634, p.107, $21.95) and Always Artichoke (IBC #105243, p.157, $7,50). I stamped the images on tissue paper. On the larger round candle I wadded up the tissue paper and then stampsed my image. In the closeup you can see the the texture it gave. On the smaller, taller candle I added a littl gold galaxy glitter with my 2 way glue. Then I put the tissue paper in place on the candle and held in it place with a piece of wax paper long enough to wrap around to the back and create a place to hold on to. I used my heat gun to melt the stampsed tissue paper into the candle. This idea will make great hostess gifts for my upcoming workshops and so easy to demonstrate.
Wednesday, October 14, 2009
It's Snowing....Challenge #41

Sunday, October 11, 2009
Join the Holiday Card Class

Holiday Card Class
Date: October 24th, noon-4pm
Price for class: $25.00
Prices include classroom instruction, use of tools and all materials for 8 cards. We will make 2 of each style pictured plus another 2 cards (design to be determined).
Stampin’ Up! Demonstrator Hutto, TX 78634
For additional information or directions, please email me at sherrysinknstamps@yahoo.com
Thanks to Sandi MacIver for the ornament card design and to Amy Celona for the Rudolph inspiration! Thanks, Ladies!

Stampin' Up! LateNightStampers Challenge 40
 For the Stampin' Up! Late Night Stampers Challenge #40 So Simple, I used Night of Navy Cardstock (IBC #106547, p.157, $7.50); Whisper White Craft ink (IBC #101731, p.156, $7.50); Snow Swirled Stamp Set (IBC #111690, p.36, $24.95); Gold Fine Galaxy Glitter (IBC #114286, p.180, $13.95 set) and Crystal Effects (IBC #101055, p.192; $6.25).
Monday, September 7, 2009
Getting A Start on the Christmas Season


I couldn't wait to use this new stamp set of 6 titled "Snow Swirled" (p.36; $24.95) from the Stampin' Up! 2009 Ideabook and Catalog. I used Versa Mark to heat emboss the tree in gold on the inside of the card. The snowflakes in the set were stamped on the front with Bashful Blue Craft Ink and heat embossed with Iridescent Ice Embossing Powder from Stampin' Up! To finish the card I stamped the verse on the inside and Season Greetings on the front, then tied it all up with Bashful Blue Taffeta Ribbon.

LNS Challenge #36

Saturday, August 29, 2009
Bigz XL Fancy Favor Box Organizer

Sunday, August 9, 2009
Diva Coffee Break Design Challenge #139
This is the first time I have entered the Diva Coffee Break Challenge. (Diva Coffee Break Designs Website). I thought the Stampin' Up! Urban Garden Designer Series Paper and the Asian Artistry Stamp Set went well together for this challenge. I used a little bit of Old Olive Ribbon Originals to add a bit of embellishment to the lower left corner. I colored all stamps with SU Writer Markers. The Curly Label punch was cut in half and attached to the sentiment.
Passion for Promarkers Challenge Week #11
Well I don't have Promarkers (Promarkers Website), but I do have Stampin' Up! Writer Markers which I used to color the rooster from SU's Rustic Rooster. Thought it went well with the Nouveau Chic Designer Series Paper from the new Idea Book and Catalog. Flowers were cut and embossed using the SU Embosslit Cherry Blossom. I used a touch of ribbon from Ribbon Originals. The Birthday sentiment is from Teeny Tiny Wishes stamp set from SU. The Brads I used for the flower centers are from Hodgepodge hardware.
Saturday, August 8, 2009
Fifth Ave Floral Project

This is a project that I will be teaching a workshop for on September 26. The workshop is $25.00 and must be paid in advance to reserve your seat. The workshop will be from 10:00 am - 2:30 pm (lunch will be provided). All supplies will be provided and you will be taking home the fold out box that holds 8 cards and envelopes. Please email me if you are interested in attending this workshop and I will be happy to provide you will all details. I have a limited number of spaces available, so please reserve your seat as soon as possible.

Wednesday, August 5, 2009
Rubbernecker Stamps-Wacky Wednesday #23
This is my first entry for the Rubbernecker Stamps-Wacky Wednesday #23 Rubbernecker Wacky Wednesday is inspired by some of my favorite embossing folders and embosslits. The paper and ribbon is Stampin' Up Melon Mambo and Green Galore (Embosslit Sweetest Stem). The Cuttlebug die cut butterfly hovering above the Prima Marketing flower is on a hidden spiral and embossed with a Cuttlebug embossing folder. A little glitter gel pen adds some bling. The sentiment tag is cut from the SU Modern Label punch (trimmed) and stamped with StazOn.
Tuesday, August 4, 2009
Mojo Monday Week #98 Challenge

Tuesday, July 28, 2009
Dream Gardens
Saturday, July 25, 2009
Have a Petal Party Birthday!
What better way to enjoy a hot summer day, than by staying inside (and stayin' coo) to create a bright flowery birthday card with Stampin' Up! products! The coordinated papers used in this card are from the Simply Scrappin' Kit Petal Party. This kit also includes the embellishments (except for the ribbon which is the new 1/2" Polka Dot in Melon Mambo and the designer buttons in Certainly Celery. The Birthday Wishes stamp is from the Sincere Salutations Stamp Set and was stamped in Pixie Pink. The textured Old Olive background paper is also from the kit and was embossed with the new Elegant Bouquet Embossing Folder using a Sizzix Emsobbing Machine. All products on the card are made by Stampin' Up! and are available in the 2009-1020 Idea Book and Catalog.


